Saturday, September 10, 2016

Rocket Ship: When to Flee

Yesterday I ran across the following quote:
"If you're offered a seat on a rocket ship, get on, don't ask what seat." -  Sheryl Sandberg
Which leads me to a related point:
"If you're on a poorly maintained, poorly fueled, poorly aimed rocket ship... for goodness' sake GET OFF RIGHT NOW."  - Me

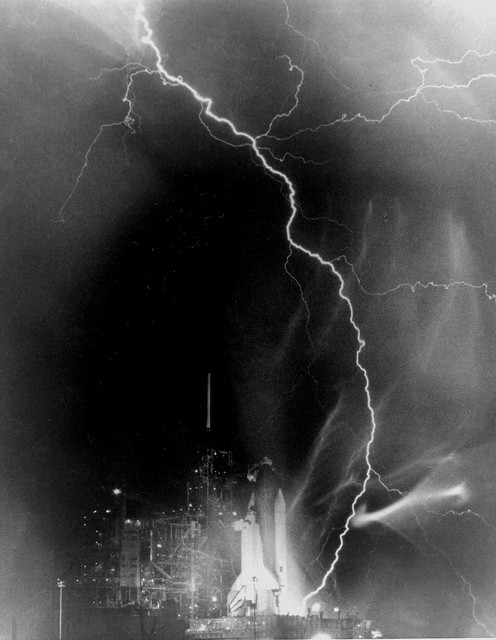
Electrical Storm at Kennedy Space Center
If this happens while you're taking off, flee!
 (Image Credit: NASA)


Recently I quit my engineering job at a Fortune 500 company. Although I've had a few days where, fueled by boredom and loneliness, I have wished I was still there, I'm very happy to be free.

Don't get me wrong, I'm a believer in intelligent, well-educated women.  I enjoy what I learned in graduate school, and I'm looking forward to applying it in the future.  But I was sacrificing my health to remain at that job, and I only have one body to live in.

I don't want to get personal about what went wrong.  I'm trying to forgive those involved.  But I can't work somewhere where creative, hard-working, prolific people are constantly put down (even though it's unintentional).

Engineering ladies, if this describes you, find a different job before you burn out!  It's really hard to wait for your self-worth and motivation to grow back.

Thursday, September 8, 2016

Dropped-Waist/Blouson Dresses: A Curvy Girl's Survival Guide

I am on a quest to find perfectly comfortable casual dresses to wear.  I have a very dynamic life as a stay-at-home engineer.  My outfits need to go from cleaning the sink to writing software to shopping for groceries to doing laundry to wrangling kindergartners at my church.  I want to be stylish and comfortable.

I impulse-purchased a knit racerback dress for $20 at Target in the spring. (Yes, I know, that's like fashion mistake #1.)  It was A-line and kind of hung like a bag on me.  I belted it and ignored the odd silhouette, mostly because I wanted to get "my-money's worth" out of it before attempting alterations.

My first try was to add a strip of elastic to gather the waist, like other casual dresses I had seen at the store.  This converted the dress to a blouson style.   Which leads me to make the following Public Advisory Notice:

Warning: Some blouson dress or dropped-waist dress styles only flatter stick figures.


For those of you out there that already knew that, feel free to say, "I told you so."  I will admit I was taken in by an ill-conceived fad this time.

So I guess I'll be removing my original alterations and trying something else. (Good thing they weren't permanent.)  I plan on detailing my sewing quest in an upcoming post. In an attempt to determine my next steps, I've created the following helpful style guide for curvier women (such as myself).

Blouson Dresses

Extra care must be taken to define a waist in the presence of a lusher torso. 

No, no, no

The following dresses fail at this concept.

These dresses have elastic bands to draw in the waist.  But because there's so much bulk both above and below that waist, it's worse than no waist at all.  All that's left is a crease that draws your eye right to it and the added bulk there from the cinched fabric.  Just say no!

Much Better

These styles define the waist by slimming down the skirt.  The sense of unbalance between the top and the bottom makes the waist look smaller.


Potentially Even Better

These dresses feature a dropped waist instead of a blouson style.  The two styles sound similar to the untrained fashionista and might be used interchangeably.  The key to choosing the right dropped waist is similar to choosing the right blouson: intentional unbalance.  Here, the top is slimmer than the bottom, whittling the torso and elongating it without sacrificing the frill of the full skirt.

Well, there you have it. Hope this helps someone!

Thursday, April 7, 2016

Fixed: Gimp 2.9 crashes and/or segfaults on Fedora 23

I love GIMP 2.9 because the user interface is way more modern than GIMP 2.8.  Because GIMP 2.9 will never be released (it paves the way for a future GIMP 2.10), I built it myself over six months ago.

However, it started crashing after our recent updates to Fedora 23.  GEGL was broken, causing the application to hang.

This fortunately has a pretty quick fix as I discovered today.  Just rebuild and reinstall GEGL system wide.  The GEGL developers have patched the problem in the master branch.

It's working again :)

Wednesday, March 2, 2016

Learning Vulkan for Fun XOR Profit: Part 2, Getting a Spinning Cube to Run

Let's work on getting your environment set up.  I'm using an Intel Broadwell GPU and Fedora 23.
  1. Build your Vulkan driver:
        a. Get your Vulkan driver:

git clone git://anongit.freedesktop.org/mesa/mesa
cd mesa

git checkout -b vulkan origin/vulkan

        b. Install your dependencies:

sudo dnf install libxshmfence-devel 

        c. Configure it

./autogen.sh

        d. Build it

make -j4 

     2. Get a linker.  Vulkan, like OpenCL, requires a system to go out and find the correct Vulkan install:

sudo dnf copr enable ajax/vulkan
sudo dnf install vulkan-devel


     3. Get your spinning cube program.  I'm using Kristian Hogsberg's vkcube:

cd
git clone https://github.com/krh/vkcube.git
cd vkcube

./autogen.sh
make -j4

    4.  Tell your spinning cube where Vulkan is:

export VK_ICD_FILENAMES=/home/[username]/mesa/src/intel/vulkan/dev_icd.json

    5. Run it!!

./vkcube

You should see something like this, a multicolored spinning cube:


Tuesday, February 16, 2016

Announcing a New Series: Learning Vulkan for Fun Xor Profit


Today was the big unveiling of the new Khronos graphics API Vulkan, the successor to OpenGL. I've decided to do a tutorial series on learning the new API for your reference (and my enjoyment).

I'm going to exclusively use the new Intel open source driver, Anvil, which is part of the Mesa project.  To use Anvil, you need to have an Intel integrated graphics card of generation IvyBridge or later.

To start, git clone git://anongit.freedesktop.org/mesa/mesa and checkout and build the Vulkan branch.

Wednesday, January 6, 2016

The Salvation Army Top Refashion

Happy New Year!  I recently went to a thrift store to buy paint clothes, and I came away with an impulse buy.  This vintage feed-sack print blouse was originally a size XL standard button-up. Nevertheless, the pin tucking and smocking at the front was difficult to resist.

With some help from one of Renegade Seamstress's tutorials, I turned it into a much more fitted, feminine blouse.  Check it out:

I was really scared of cutting off and then re-setting in the sleeves.  I haven't done sleeves in a long time, and the curve seems so mysterious.  With the help of Merrick's Art's tutorial on designing new sleeves, I was able to get the shape of the sleeve cap to fit the armscye on the first try!  Ok, so maybe I got lucky this time.  Either way, sleeves seem a bit less scary now.

The hardest part was dealing with the sheer polyester fabric.  It was kind of fragile and had a tendency to pucker with the stitches.  I had to lower the pressure of my presser foot to avoid puckering the seams too much.  It wasn't easy, but I think it turned out well enough to wear.

Happy Wednesday!


Wednesday, September 23, 2015

Teaching Yourself Graphic Design Part 2

The next step is to get ahold of tools for graphic design.  In my post Graphics in Presentation Software, I demonstrate how to use Microsoft Powerpoint to create a graphic.  Microsoft Powerpoint has increased a lot in capability for image manipulation and drawing in recent years, and its wide availability means that it's easy to edit files on multiple computers.  However, it's still quite limited as a graphic design tool.

For my training, I will recommend that you download GNU Image Manipulation Program (GIMP).  GIMP is free and open source, and it's closest competitor is Adobe Photoshop.  Photoshop is the tool of choice for most graphic artists, but it is expensive and has a steep initial learning curve.

To get a copy of GIMP, visit http://www.gimp.org/downloads/ and click on your operating system.  Once you have installed it, open it up.  It may take some time to load.  Go to the Windows menu and make sure Single-Window Mode is checked if that is an option for your copy.  This will make sure that all your tools are in the same place.

To start drawing with GIMP, go to File > New....  You'll see a pop-up menu with 640 x 480 as the width and height.  Click OK.  You should now see something like the following:


The white square in the center is your drawing canvas, 640 pixels wide by 480 pixels tall.  Click on the paintbrush in the upper left.  You should now see a brush when you hover your mouse pointer over the white canvas.  You can draw freely and use the pink eraser to erase.  Pressing on the black and white squares under the brush and eraser and other tools will bring up a color changer that allows you to change their colors.  Great.  This is exactly like Microsoft Paint so far.  Pretty easy.

After scribbling around for a while, I have the following:


It's not very interesting.  However, I have clicked on the yellow back arrow tab in the upper right-hand corner, revealing a vertical list of images.  Each separate stage in my scribbling (meaning a session of point, click, drag, unclick) is recorded here as an image.  If I click on a previous stage, I can quickly go back to that previous stage.  This "undo stack" is pretty handy if you make a mistake.  But you have to be careful:  if you modify a previous step, all the following steps will disappear.

You should be able to try out the various tools now and undo their functions to your heart's content. When you want to save your artwork, click File > Save.  You will notice the resulting file has an extension of .xcf.  This file is unique to GIMP.  In later tutorials, you will see that .xcf files retain more information about how you made the artwork so you can easily change things later.

To save your artwork in a more traditional form, choose File > Export and save with a .png or .jpg extension.  A .png file is larger but may have better quality; a .jpg file is more economical for emailing the file.  You should have also saved it as a .xcf so you can make changes later.

Enjoy playing around with GIMP and trying things out!  I'll be back with more lessons later.

Side Note:  You'll see that GIMP isn't as good for drawing shapes (vector images).  For doing that, you'll want a separate program.  Another free and open source program for shapes is Inkscape (https://inkscape.org).  Feel free to try out that one as well.